Motorizing a Malt Mill
By Mike Dixon
mpdixon@ipass.net
Crushing grain for beer making can be an arduous task. The options for the home brewer are to have it ground at the store or supply house, or purchase a mill. If the grain supplier crushes the grain, then the brewer is faced with using the grain in a short amount of time to insure freshness. If the brewer decides to purchase a mill and grind the grain at home, then the task can be made much easier by motoring the mill. Many brewers utilize a cordless drill for mill motorization, but it is tough on the drill and shortens its useful life. With a good quality drill going for hundreds of dollars, it makes more sense to motorize the mill.
There are many types of mills on the market, but the majority of home brewers use one of the following three: Corona Mill, Valley Mill, or the JSP Maltmill. Prior to motorizing the mill, it is suggested that the home brewer contact the supplier and find their recommendations for the mill’s RPM (revolutions per minute). That information will insure that the grain is traveling through the mill slow enough to obtain a proper crush. If the mill’s manufacturer cannot be contacted, then a good rule of thumb is to not exceed 60 to 100 RPM. (That is approximately the maximum speed a human can turn the mill while crushing the grain.) I motorized the JSP Maltmill and after contacting the manufacturer, I decided to try and keep the motor speed below 300 RPM.
The question is now, how do I drive the motor. In order to drive the motor directly you must get a gearmotor that is in the RPM range desired, along with a shaft coupling and spider insert. The motor can be directly mounted without the spider insert, but it might cause vibration and wear on the mill. The other two options are to run the mill using indirect mounting and using a chain and sprocket, or a V-belt and sheave. Since the v-belt and sheave is cheaper and less dangerous that the chain and sprocket, I chose this option.
Next comes the question of which motor do I choose. This is not an easy question. Certainly one with less that 1/2 Hp (horsepower) should be sufficient. Motors come in a variety of shapes, sizes, RPMs, and torques. A fellow home brewer who had motorized his Valley Mill suggested to me the motor that he chose. It came from a surplus catalog. www.herbach.com Since he had utilized the motor with his mill, I felt it would be appropriate for my application as well. The motor I chose was a Robbins and Myers KPG motor (#TM89MTR1882/C. It was used in a prior life as a photocopier motor). It was 115 VAC (volts alternating current – household wall outlets), 1/8 Hp, 1725 RPM, capacitor start (included), clockwise rotation 3/8" shaft, with a high running torque. It was also only $3.25 plus shipping, but it weighed 15 lbs, and the minimum order from them was $25.
Now that a motor has been selected, the appropriate V-belt sheaves must be selected. (Sheaves are basically pulleys that are being driven). What speed reduction is desired? This is an easy question to answer; it can be summed up by dividing the speed of the motor by the desired speed of the mill. In my case:
1725 RPM/300 RPM = 5.75
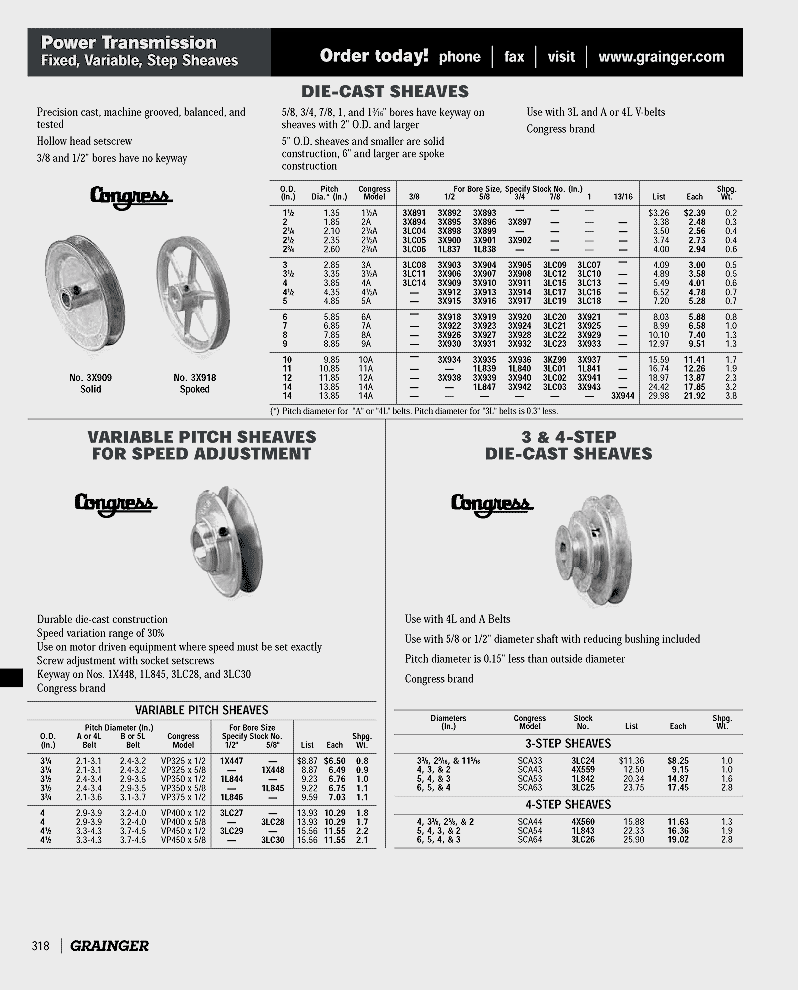
Do not be thrown off by the number not being a whole number. Now look at a V-belt sheave selection chart to see what off the shelf items are available. I used the printed Grainger Industrial Supply book www.grainger.com. In catalog 391 it was on page 318.
The reason to look at this size sheave is because it is designed for belt type 3L or A which are both rated for Hp’s less than 3.
For my application I needed a 5.75 or less speed ratio. To find the size of the mill sheave pitch diameter, you multiply the size of the motor sheave pitch diameter by the speed ratio. Looking at the Grainger page and selecting the 1 ½" sheave which has a 1.35" pitch diameter (in the second column):
1.35" x 5.75 = 7.76" pitch diameter or greater
They make an off the shelf 8" with a 7.85" pitch diameter, so I knew that would work. But a 1 ½" sheave is pretty small. The larger the drive sheave, the better for torque transmission. I decided to look at the 2" with a 1.85" pitch diameter:
1.85" x 5.75 = 10.64" pitch diameter or greater
That leads to the 11" with a 10.85" pitch diameter. I decided to go with a 12" with an 11.85" pitch diameter to slow the revolutions below 300 rpm. 12" was as large as I wanted to go. This configuration of 2" (1.85") on the motor, and 12" (11.85) on the mill would give me a speed of the mill of:
1725 RPM x 1.85" = X RPM x 11.85"
1725 RPM x 1.85"/11.85" = 269.3 RPM (below 300 RPM, a good choice)
If I had decided to go to the 60 to 100 RPM range, I would need to use another shaft and have both a large sheave driven by the v-belt from the motor, and a small sheave that would drive the v-belt to the mill. In this case, the equation gets a little more hectic, but it is still fairly straightforward. (pd – pitch diameter of the sheave)
Eq 1: Motor RPM x motor sheave pd = sheave1 RPM x driven sheave1 pd
Eq 2: Mill RPM x mill sheave pd = sheave2 RPM x sheave2 pd
Where sheave1 and sheave2 are on the same shaft that is held using pillow blocks and/or bearings. Basically the motor sheave drives sheave1 via a v-belt, and sheave2 is on that shaft so they turn at the same RPM. Sheave2 in turn drives the mill sheave via a v-belt. The smaller sheave sizes (motor sheave and sheave2) should be kept as large as possible for maximum torque.
Lets run through an example at 60 RPM:
Motor RPM/Mill RPM = (mill sheave/motor sheave) x (sheave1/sheave2)
1725 RPM/60 RPM = 28.75
If we use the 12" (11.85") and 2" (1.85") previously found then:
28.75 = 11.85"/1.85" x (mill sheave/sheave2) or
mill sheave/sheave2 = 4.49
So I would choose a 2" (1.85") and a 9" (8.85") to give a ratio of 4.78
Rechecking the Eqn: Motor RPM/Mill RPM = (mill sheave/motor sheave) x (sheave1/sheave2):
(8.85"/1.85") x (11.85"/1.85") = 30.64 ratio
1725/30.64 = 56.3 RPM
The shaft diameter on the mill and motor now come into play. The shaft on the JSP Maltmill is 3/8". This is not a standard size for a large diameter sheave. A steel sleeve is required to get to the ½" diameter of the 12" sheave. It is Grainger part number 4x664. The motor shaft size was also 3/8", but that is a standard size in the 2" sheave, and was not a problem.
Now a belt must be selected from the standard available sizes. Since I was using a sheave less than 3 Hp I needed a 3L v-belt (Grainger page 313). They come readily available in 1" increments from 15" to 61". In my case the diameter of the motor pulley was 2" and the diameter of the mill pulley was 12". That means the motor sheave radius is 1" and the mill sheave radius is 6". Remember that 2 x radius = diameter. In order for the two sheaves not to touch, the distance between them must be greater than 1" + 6" or 7".
A good approximate formula for distance between the two sheaves is:
L = 2C + 1.57(D + d) where L = total belt length
C = center distance of the shafts
D = mill sheave pitch diameter
d = motor sheave pitch diameter
Rearranged it looks like:
C = (L - 1.57(D+d))/2
If you input some stock lengths for L, using my sheave selections of 11.85" and 1.85" you can see how it would work out. (C must be greater than 7")
L = 20", C = >1" (no good)
L = 30", C = 5.76" (no good, too close)
L = 40", C = 9.25" (acceptable, but a little close for my design)
L = 50", C = 14.25" I chose this size
I could have picked almost any size above 40", but I chose 50" since it was a size that would work for my application, and it would be easy to remember if I ever needed a replacement.
Now you must decide how to mount the motor and mill to allow you to tighten the v-belt. In my application I wanted to keep my mill as portable as possible. I had a piece of 12" wide countertop, so I decided to mount the mill and motor onto the countertop in an arrangement so they could be supported by an old brewing bucket which would accept the crushed grain and a stabilizer leg. A table could be made, and any number of configurations could be utilized, but this simple arrangement worked best for me.
I made the motor mount out of ¾" luann plywood. I cut the front out using a borrowed Rotozip www.rotozip.com, and drilled the mounting holes with a spade bit on the drill. For the back, I again cut a circle for support. I placed a top on using drywall screws, and for the bottom, I drilled the luann and then used the Rotozip to make long adjusting holes.
I then took the Rotozip and cut the bottom of the countertop so the bucket would recess into it and give me a tight seal. I then placed the countertop on the bucket and measure to cut a leg out of excess plywood. I attached it using small hinges so it would fold up. I then took the old JSP Maltmill base and used it as a template to mark the countertop so I could cut a slot for the grain to be discharged, and to mount the mill to the countertop. I cut the slot again using the Rotozip.
For the motor power supply I used a household a switch, box, and faceplate and wired according to the directions from Herbach and Rademan. They had included two capacitors for starting the motor and I wired them using 18 gauge wire and terminals.
Capacitors wire in parallel as in the following diagram (Don’t worry, if you wire it wrong the motor will not start).
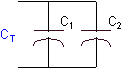 CT = C1
+ C2
CT = C1
+ C2
In my case CT was 6 mF (micro Farads) and H&R had supplied me with two 3 mF capacitors. Some motors come prewired and with the capacitors installed.
After I placed the sheaves on the motor, I stretched the belt and marked the mounting holes for the motor mount. I drilled the holes and placed bolt through them and the adjusting holes in the motor mount.
If I had to do it all again, I would most likely find a motor with a little more torque. The motor works fine, but it needs to be running before you add the grain. After that, I have found no grain that can stop it.
If you grind grain by hand you should definitely motorize your mill. Hopefully these notes will make it a little easier for you to do.
The costs involved were approximately:
Motor $ 3.25 + shipping
Cord for motor 3.00
Outlet box 0.50
Wire 5.00
Assorted Wire Terminals 2.00
Faceplate 1.50
Switch 1.50
12" Sheave 12.93
2" Sheave 2.31
Steel Sleeve 3/8" to ½" 3.31 (3 per box)
50" V-belt 5.29
Total $ 40.59 + motor shipping and time
Appendix A:
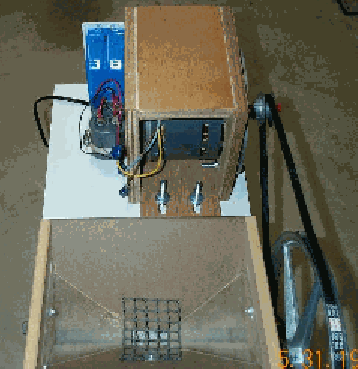
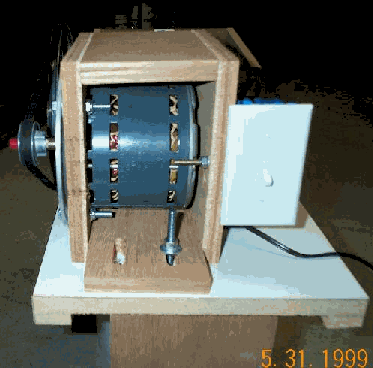
Pictures
Below are some views of the motor housing and capacitors:
And of the switch:
A bottom view where the bottom sits on the bucket 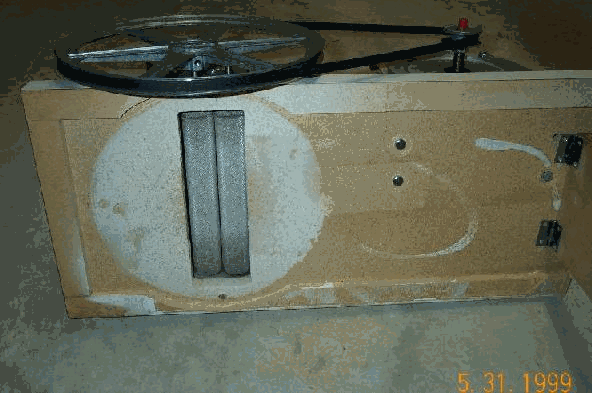
And a side view of the whole setup: 
Appendix B
Vendor Information
Corona Mill
Landers Y Cia. S.A.
Carrera 53 No. 30-27
Medellín – Colombia
Phone (574) 350-0060
Fax (574) 351-2010
http://www.landers.com.co/engmolinos.htm
info@landers.com.co
Valley Mill
Valley Brewing Equipment
1310 Surrey Avenue
Ottawa, Ontario, CANADA K1V 6S9
(613) 733-5241
valley@web.ca
http://www.web.net/~valley/valleymill.html
JSP Maltmill
Jack Schmidling Productions, Inc.
Marengo IL 60152
Fax:815 923 0032
arf@mc.net
http://user.mc.net/arf/maltmill.htm
Herbach and Rademan
H&R Company, Inc.
Sales: 800-848-8001
Business: 856-802-0422
Fax: 856-802-0465
sales@herbach.com
http://www.herbach.com/
Grainger
W. W. Grainger, Inc.
100 Grainger Parkway
Lake Forest, IL 60045-5201
www.grainger.com
postoffice@Grainger.com
Appendix C
Note on motorizing JSP Maltmill from Jack Schmidling
MOTORIZING A MALTMILL
For reasons of product liability and greedy lawyers, we do not give recommendations on motorizing our product. It is shipped with a handcrank and it is presumed that if a user wishes to motorize it, the user assumes the responsibility and risk. We expect the user of such a modified mill to call a doctor and not a lawyer in the event that injury results from motorizing it.
We can however, provide information that users have found to work well.
The mill should not be run beyond about 500 RPM as the efficiency starts dropping at around this speed because malt is thrown around rather than being fed through the rollers.
The easiest but least desirable method of motorizing is to use an electric drill if it has sufficient torque to drive the mill at the above RPM.
If a drill is used, two additional flats should be ground on the shaft 120 degrees apart to provide proper seating for the 3 jaw chuck. The chuck must be kept tight at all times or the hardened jaws can chew up the end of the roller shaft. The weight of a heavy drill or leaning on it can bend the shaft. If something hard gets stuck in the rollers, either the rollers or the drill can be damaged.
The ideal way to achieve a reasonable speed is to put a 3" pulley on a 1700 RPM motor and a 12" pulley on the mill. Connecting the two with a V-belt will provide about 425 RPM. (3/12 X 1700=425) Just about any size motor will operate the mill but 1/2 HP is probably ideal.
The feet can be removed from the base and the base screwed to a larger board with the front of the mill hanging over the edge.This provides room to mount the motor behind the mill.
..........
The dangers to be aware of are the following:
Belts and pulleys have been known to remove fingers and that is why machines so equipped have belt and pulley cages.
Dust can be explosive and that is why explosion proof motors have been invented.
The rollers are designed to crush things. The finger guards that are installed on the mill are to keep fingers out of the rollers and of a round cross section. DO NOT REMOVE THEM.
Turning a crank might be a pain, but so are crushed fingers.
js